
TL;DR
Acoustic dampening in a closet isn’t about total soundproofing but about reducing reflections and echoes. Proper mic placement, sealing gaps, and strategic treatment turn a small space into a better recording zone. Moving the rig out or into a ventilated closet can dramatically cut noise and improve sound quality.
If you think a tiny closet is a bad place for good sound, think again. The secret isn’t just in fancy foam, but in how you position your gear and treat the space around it. Small rooms can become surprisingly good for recording when you understand the difference between dampening echoes and blocking sound leaks.
In this guide, you’ll learn why moving your rig into a closet might be your best move, how to treat that space without overdoing it, and the crucial role of mic placement. Whether you’re a content creator, podcaster, or hobbyist, these tips will help you tame reflections and keep noise from escaping — all without building a soundproof studio.
Acoustic dampening
& the rig in the closet.
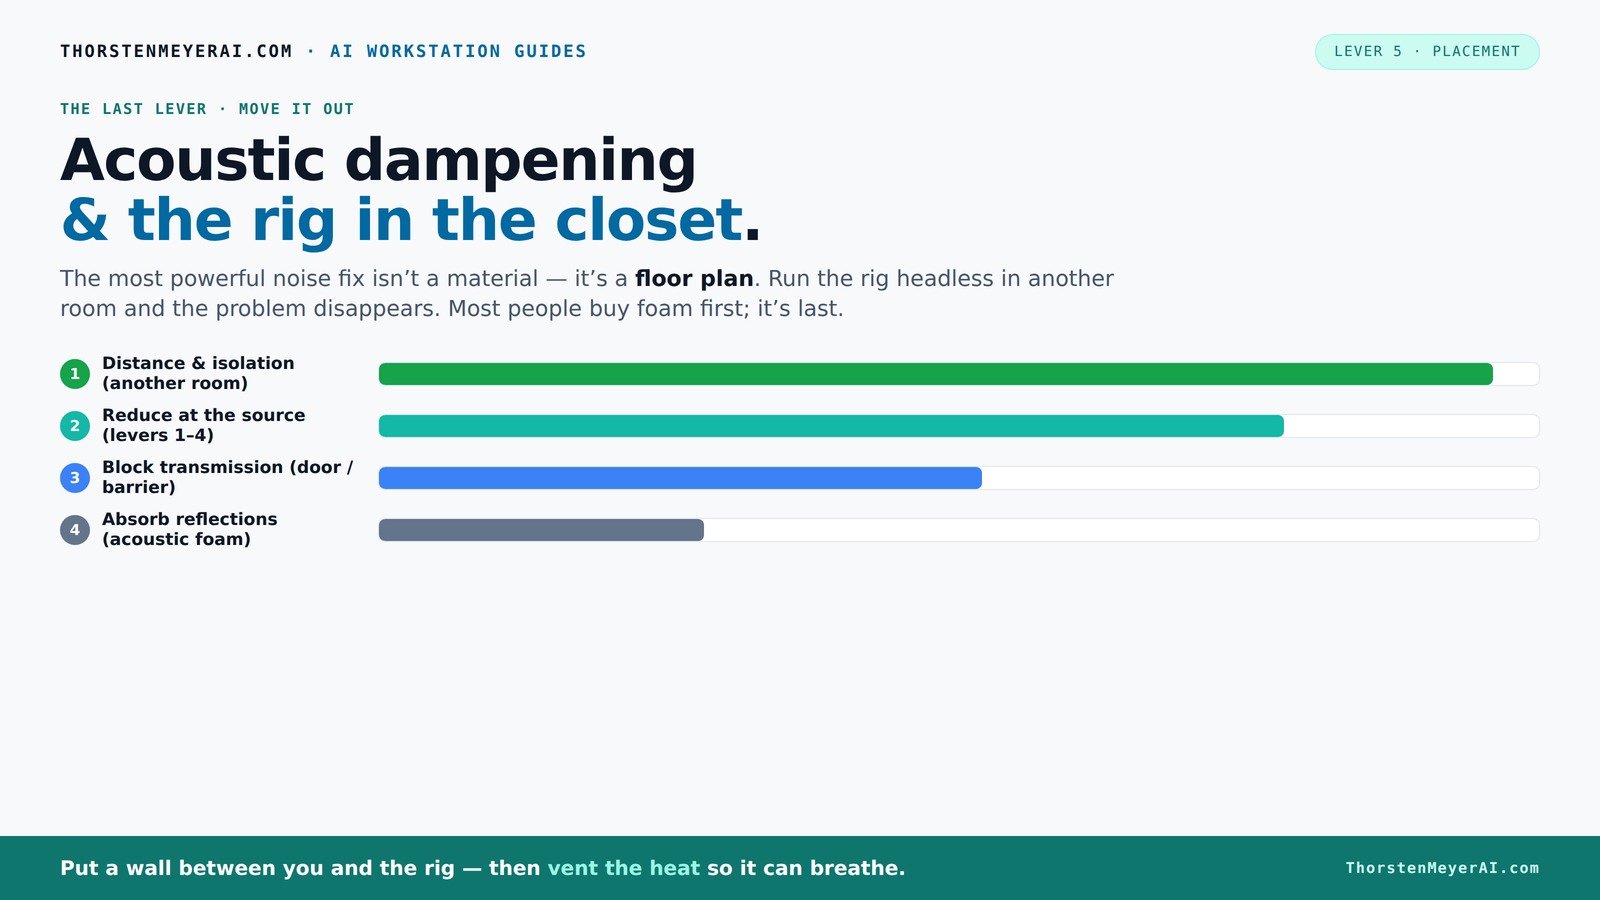
The most powerful noise fix isn’t a material — it’s a floor plan. A rig you can’t hear because it’s in another room beats any amount of foam. Tap the approaches in Part 1 to see what actually works.
(another room)
(levers 1–4)
(door / barrier)
(acoustic foam)
Contain the noise, not the heat
Key Takeaways
- Moving your rig into a well-ventilated closet can eliminate most noise issues, especially when you're working remotely.
- Layered soft materials like blankets and acoustic curtains are more effective than foam panels alone in small, reflective spaces.
- Sealing gaps around doors and vents is crucial to prevent sound leaks, often more impactful than interior damping.
- Proper mic placement—away from reflective surfaces and at the right distance—can dramatically improve recording clarity.
- For bass issues, install thick bass traps in corners to tame low-frequency boominess common in tiny rooms.

Focusound 52 Pack Acoustic Foam Panels 1" x 12" x 12" Sound Proof Foam Panles Soundproofing Noise Cancelling Wedge Panels for Home Office Recoding Studio with 300PCS Double-Side Adhesive
- Soundproofing Design: Triangular grooves for noise absorption
- Includes Adhesive Tape: 300pcs double-sided adhesive for easy installation
- Easy Shape Recovery: Reforms after soaking in water
As an affiliate, we earn on qualifying purchases.
As an affiliate, we earn on qualifying purchases.
Acoustic Dampening vs. Soundproofing: What's the real deal?
Many people mistakenly think foam panels will silence their room. But acoustic dampening and soundproofing are two sides of a different coin. Dampening reduces echoes and reflections inside the room, making recordings clearer. Soundproofing, on the other hand, blocks sound from escaping or entering.
For example, a closet lined with thick blankets and acoustic panels will soften the echo but won't stop noise from leaking out if the door isn't sealed. Conversely, sealing gaps and adding mass to walls can contain noise but won't reduce reflections inside.
Understanding this distinction matters because it helps you prioritize your efforts. If your main concern is clarity and reducing echo, focus on dampening. If noise escapes and bothers others, then soundproofing is necessary. Often, a combination of both yields the best results, but knowing which to emphasize saves time and money, and prevents over-treatment.
Best closet dimensions and layout to make life easier
Small is sometimes better — but only if you treat it right. A closet around 4x4 feet with a ceiling height of about 8 feet provides enough space to work without creating excessive echo or bass buildup. You can learn more about optimizing small spaces for sound at this guide. Think of it like a mini cave that can be tamed with the right materials.
Maximize space by keeping equipment close but not touching the walls. Leave a few inches between your mic and the closet wall to prevent sound reflections from bouncing directly into it. Add a shelf or platform for your gear, so it’s slightly elevated and reduces vibration transfer.
For example, a YouTuber transformed a 3.5x3.5-foot closet into a vocal booth by hanging thick blankets on the walls and ceiling, creating a cozy, controlled environment that sounds way better than just the bare space.
Choosing the right size and layout is crucial because overly small spaces can cause bass buildup and excessive reflections, degrading sound quality. Conversely, a well-optimized small space with proper treatment can outperform larger, untreated rooms. The key is balancing size with effective acoustic treatment and thoughtful placement.
How to position your mic for the clearest sound in a tiny space
The biggest factor in capturing good sound is placement. In a small closet, the mic should be at least 6-12 inches away from reflective surfaces like walls or blankets. This reduces unwanted reflections and echoes.
Use the 'reflection point' rule: position your mic so it’s not directly facing a wall, and angle it slightly away from reflective surfaces. This minimizes the sound bouncing back into the mic, which can cause comb filtering and muddy recordings. A dynamic mic placed about 4-6 inches from your mouth, aimed slightly downward and away from walls, often works best in small, reflective rooms because it rejects some ambient noise and reflections.
For example, a podcaster found that moving their mic just a few inches off the wall and angling it downward dramatically cleared up their recordings, cutting background echo by nearly 50%. Proper positioning means fewer echoes, clearer voice capture, and less post-production cleanup. The tradeoff is that too close can cause proximity effect or muffling, so finding the right distance is key.
Treating the door and gaps: The weak points that leak sound
Doors and gaps are the Achilles' heel of closet sound control. Even tiny cracks let sound escape and noise come in. A solid seal is your best friend here.
Seal gaps with weatherstripping, acoustic sealant, or draft blockers. For closet doors, a blanket or heavy curtain can also help, especially if you can hang it as a door cover. This prevents sound from leaking out and outside noise from coming in, which is especially important if you’re recording at odd hours or in noisy environments.
Sealing gaps reduces the amount of noise that escapes, making your space more contained. This is especially crucial for sensitive recordings or when trying to keep noise pollution from disturbing others. The tradeoff is that over-sealing without ventilation can cause heat buildup, so ensure adequate airflow. Proper sealing combined with ventilation ensures a quiet but comfortable space.
For example, sealing a closet door with foam weatherstripping reduced sound leakage by over 60%, transforming a noisy room into a quiet zone that’s perfect for recording while maintaining airflow through small vents or fans.
Blankets, foam, and panels: What's the best treatment for small spaces?
In small closets, layering soft, absorbent materials makes a big difference. Thick moving blankets, acoustic curtains, and foam panels all help tame reflections. For bass buildup, thicker panels or bass traps are key.
Understanding why these materials work helps you choose wisely. Thick blankets and curtains absorb a wide range of frequencies, especially mid to high, and are easy to deploy. Foam panels excel at controlling specific reflection points but are less effective at low frequencies unless they are dense or supplemented with bass traps.
For instance, draping multiple blankets on the walls and ceiling reduced echo and made vocals sound warmer and more natural. Combining blankets with foam panels in reflection hotspots delivers the best results. The tradeoff is coverage versus cost—covering more surface area with soft materials generally yields better sound, but overdoing it can make the space feel cluttered and impede airflow.
Strategically placing these materials at reflection points, corners, and ceiling junctions maximizes their effectiveness, creating a more balanced and natural sound profile within the small space.
Handling bass buildup — do you need bass traps in a closet?
Bass frequencies love to bounce around small rooms, creating that boomy, muddy sound. Bass traps — thick, dense panels placed in corners — absorb these low frequencies. Without proper bass trapping, recordings can sound hollow or boomy, reducing clarity and warmth.
Adding bass traps in the corners of your closet can significantly improve sound quality by reducing low-end buildup and making vocals and instruments sound tighter and more natural. Thicker panels (3-4 inches) are more effective at low frequencies than thin foam, which often only absorbs higher frequencies.
For example, a creator installed DIY bass traps in their closet corners using dense mineral wool wrapped in fabric. This resulted in a noticeably clearer, less muddy sound with better bass definition, especially in recordings of vocals and bass instruments. The tradeoff involves space and cost—bass traps take up room and are slightly more expensive but are often worth the investment for professional-sounding results.
DIY closet booth: How to build a quiet, effective space on a budget
You can craft a pretty decent recording space without spending a fortune. Start with thick blankets, acoustic curtains, and some basic framing. Hang blankets from the ceiling and walls, leaving a gap for airflow. Use lightweight framing like PVC or wood to create a simple enclosure that fits your space.
Use rubber feet or anti-vibration pads under your gear to cut structure-borne noise. Seal gaps around doors with weatherstripping or draft stoppers. Layering materials is key — more soft stuff equals less echo and less noise leakage. Be mindful of ventilation—adding a small exhaust fan or vent can prevent heat buildup without compromising sound isolation.
For example, a hobbyist built a portable closet booth with a PVC frame, draped with blankets, and added a small exhaust fan for ventilation. It cost under $200, and with proper treatment, it sounds better than many commercial solutions. The tradeoff involves balancing cost, portability, and sound quality, but a DIY approach allows customization and scalability.
Common mistakes to avoid in tiny recording spaces
Don’t assume foam alone will solve all your problems. Foam absorbs but doesn’t block sound, so leaks and echoes may still ruin recordings. Also, avoid sealing a closet completely without ventilation — heat buildup kills your gear and your mood.
Another mistake is ignoring reflection points. Sound bounces off untreated surfaces, causing muddiness and reducing clarity. Treating only the center of a room while ignoring corners and ceiling junctions leaves many reflection paths unaddressed. Lastly, don’t forget to seal gaps around doors and vents; they are the weak links in your sound chain. Failing to do so can allow noise leaks that compromise your recordings and disturb neighbors.
For example, a YouTuber learned that sealing gaps and adding thick blankets improved their sound quality tenfold, while just adding foam panels didn’t make a noticeable difference. Recognizing and addressing these common pitfalls can save you time and money, leading to a more effective setup.
The tradeoff is that over-treating can make the space feel cluttered and impede airflow, so balance is key.
Frequently Asked Questions
Is acoustic dampening the same as soundproofing?
No, acoustic dampening reduces echoes and reflections inside a room, making recordings clearer. Soundproofing blocks sound from escaping or entering the space, preventing noise leaks. Both are important but serve different purposes.
Where should I place the microphone in a closet booth?
Position your mic about 6-12 inches away from reflective surfaces, aiming to minimize direct bounce-back. Use the reflection point rule: keep it slightly off walls and angle it away from surfaces to reduce echo and get clearer recordings. Proper placement reduces the risk of unwanted echoes and ensures your voice is captured cleanly, which is essential for professional-sounding results.
Should I treat the walls, ceiling, corners, or door first?
Start with reflection points—walls and ceiling—to control early reflections that cause muddiness. Then, seal gaps around the door and vents to prevent noise leaks. Adding bass traps in corners helps control low-end buildup. Prioritizing these steps ensures a balanced treatment approach, addressing both sound quality and noise containment efficiently.
How much of the closet should I cover?
Cover as much surface area as possible, especially at reflection points, ceiling, and corners. Focus on layering blankets, panels, and foam to tame echoes without overdoing it. The goal is a natural sound that isn’t overly dampened, preserving some liveliness while reducing problematic reflections.
Do foam panels work, or are moving blankets better?
Both have their strengths. Foam panels are effective at controlling specific reflection points, especially mid to high frequencies. Moving blankets and curtains provide broad absorption and are excellent at covering large areas, especially at reflection hotspots. Combining the two offers a versatile, cost-effective approach—layering blankets for general absorption and foam for targeted treatment yields a more balanced, natural sound.
Conclusion
Transforming a closet into a quiet, effective recording space is all about smart placement, layered absorption, and sealing leaks. It’s surprisingly simple—your tiny space can become a sonic sanctuary with just a few tweaks.
Remember: the best soundproofing starts with moving the rig out of your way, then treating reflection points and sealing gaps. Your recordings will thank you, and so will your neighbors.